It's finally complete, so have a look. If you're a crafter and wish to swap links, send me a message and I would be happy to do the exchange.
All that aside, I'm fairly busy with commissions and cleaning up shop as of late, but I've tried to put in the time for various crafty ideas for all those lolita loving artists out there. If you have any ideas or have seen some lovely crafts you'd like to share, I'd be more than happy to list them here, too. I am still working on my star tutorials and will have a new one posted up soon. Probably today or tomorrow.
In the fashion world I've been oogling over Infanta's new winter coats like crazy. Can you imagine how nice the cashmere must feel? All those beautiful designs and perfect stitching and intricate embroidery just steals my breath away. I dare say I will be disappointed when winter comes to an end, because there is such an elegance in nice winter coats, lovely gloves and warm boots. I personally own a very nice long black suede coat with faux fur trim, but having one of those babies at Infanta would blow it out of the water. Alas, I've been saving up for Sakuracon and I don't think I could afford putting money away toward any fashion items just yet. Upon summer I should hope that will change, and I can post up some gorgeous new outfits I just might get.
Showing posts with label art. Show all posts
Showing posts with label art. Show all posts
Friday, December 2, 2011


Thursday, December 1, 2011
How To Make A Snow Globe

Pretty much anything around the house that is clear and can be sealed is able to be a snow globe. Mason jars are a common option, but I personally like to reuse salt and pepper (or other spice) shakers. Depending on the size of your globe, these can be used for just about anything, including christmas presents. Small ones can even be used as ornaments; just attach a ribbon or sturdy string to the top in a hoop.
My own globes will be listed for sale on my website.
Salt Shaker Snow Globe
What you will need:
- a salt shaker with the lid
- cotton stuffing
- something to put inside (I used a doll charm I made out of poly clay)
- glitter
- a hot glue gun and glue sticks
- decorations (ribbon, cloth to cover the lid, etc)
Step 2. Add more glue on top of the cotton, then add your charm. Using tweezers can help you to position it. Let dry.
Step 3. Fill with water, then add a decent amount of glitter.
Step 4. Squeeze a good amount of glue into the inside of your shaker cap, making sure it fills the little holes. Then coat the insides of the shaker with glue and quickly screw or press it firmly onto the top of the shaker. Let dry.
Step 5. Turn the shaker upside-down to check if water leaks. If it does, fill the leaking spots with glue to seal it.
Step 6. Decorate your globe as you wish!


How To Make A Paper Star - Crafts
Last night I was looking over some ideas in various online magazines and came across a basic paper star craft idea. It inspired me to make my own, so I've decided to post a couple of my paper star craft ideas. The first one was mostly for an experiment. I really wanted a reason to cover newsprint cutouts of stars in glitter and since I love sleeping 'under the stars', I thought an elegant, simple mobile would add a nice touch. You can add a lot of stars or extra detail if you like, but I opted for something modest with mine. I do not suggest using these for baby beds because the glitter could fall off in bits and land in a baby's eyes.
These mobiles could also easily be used to make chimes if you have weatherproof material. Even random seashells or pieces of driftwood rather than stars would sound and look beautiful. I have seashells all over my own house, and they're very useful for various crafts.
First, if you wish to learn how to make a paper star, you can do so here. There are a lot of options for different sorts of stars you can make. Once you have your stars cut out (I just used a bunch of newspaper and ads I receive in the mail) you can follow the tutorial below, or one of the other tutorials I will be listing next.
Stars Mobile
What you will need:


These mobiles could also easily be used to make chimes if you have weatherproof material. Even random seashells or pieces of driftwood rather than stars would sound and look beautiful. I have seashells all over my own house, and they're very useful for various crafts.
First, if you wish to learn how to make a paper star, you can do so here. There are a lot of options for different sorts of stars you can make. Once you have your stars cut out (I just used a bunch of newspaper and ads I receive in the mail) you can follow the tutorial below, or one of the other tutorials I will be listing next.
Stars Mobile
What you will need:
- paper stars
- glitter
- craft glue
- hot glue or strong tape
- string/ribbon
- decorations
- wire or something that can hold the stars (a bent coat hanger, etc)
- a thumbtack

- Take your stars and coat one side in glue. Then cover this with a thick layer of glitter. I mixed some glitter to make different shades. Let dry.

2. Get your wire and bend it to a circle. You can also use a paper plate or some sort of similar circle. Decorate this as you wish, then hot glue or firmly tape strings of different length to it. One string for each star.

3. Hot glue or firmly tape the tip of each star to each string. Make sure the stars are far enough apart that they don't bump into each other when hanging.
4. Add as much decoration as you want. I used a ribbon to hang my wire, and put a cluster of feathers hot glued to a ribbon in the center of the piece.
5. Hang it wherever you please. Mine is going above my bed.


Wednesday, May 4, 2011
Cute Lolita Deco Charm Sets
Posting up a few more sets of deco charms. The largest of these is only about an inch tall. The small items are roughly the size of a pea. See the below post for information on these and how they're made!

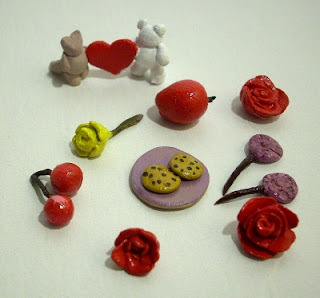


They are very, very tiny, too.
Deco Charms

Someone recently asked me about deco and I was reminded of the bag of charms/deco I've made that's been laying around. So I thought I'd take a few pictures. This set is my 'Alice in Wonderland' set and includes variations of the white rabbit, Alice's blue bow, a mini mad hatter hat (complete with a tiny sash and card) and a carrot for the bunny because, you know, bunnies love carrots.
These are made with poly clay, and are really quite easy. If you're interested in making deco you can get some clay for fairly cheap at most arts and crafts stores (Joanne Fabrics is my all time favorite). It comes in different colors, but I prefer to get white and then just paint it as the natural color of the clay can be altered when baked. The particular charms I made are -very- small. The hat itself is only an inch tall.
Tip: If you want your deco/charms to have a polished and 'glossy' look without getting expensive, apply some clear nail polish over them. Let that coat sit, then once it's totally dry, apply another coat. It works very well and is a cheap alternative to gloss paints out there. :)
Tuesday, May 3, 2011
Tutorial on How to Make a Cloth Strawberry
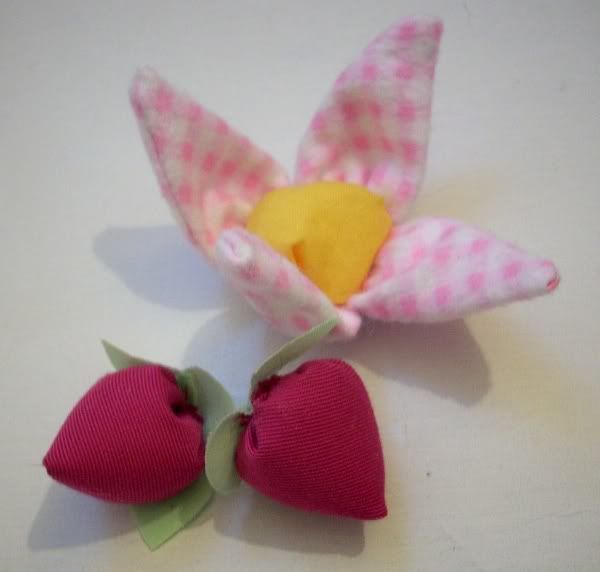
Here's a little tutorial on how to make a cloth strawberry. You can opt to make a flower instead by not stuffing the strawberry and using it as a 'petal'. Four to six petals sewn together make a very adorable flower. My flower has a cotton filled center so that it can be used as a pincushion. I do not suggest making a felt strawberry as felt tends to be a bit too thick. Something thin like cotton (in fact, I always make cotton strawberries) is much better.
On with the tutorial!


Step 2: Fold one of the halves in half, so that you have a quarter of a circle, with the face of the fabric on the inside. Sew along the straight edge, leaving the curved edge open.


Step 3: Turn it inside-out. The face of the fabric should be showing (mine is the same on both sides). Now run a small, relatively tight gathering stitch along the open edge, and do not tie it off as we will do this after stuffing. You will already see your strawberry taking shape!

Step 4: Stuff the strawberry with cotton. You can also use very finely cut up bits of fabric if you don't have any cotton. Just make sure it's well shredded. If you are making the flower, skip this step.


Step 5: Pull the gathering thread tight, this should seal up your strawberry. Stitch it securely so that it doesn't come open.


Optional step 6: Make some leaves to add to the bottom of your strawberry. If you are making the flower, just connect these petals (unstuffed strawberries) together and place something in the middle. I used a little stuffed ball of yellow cotton.
And you're done!
Be sure to leave comments, I'd love to see any ideas and finished projects involving this!
From Scraps to Scrap Box Gift Package - Perfect for Mother's Day
Project time.

So I made a box, slathered it with fabric glue, and stuck little bits and pieces of scraps to it. Topped it off with two bows I hadn't found any use for and a bit of ribbon from an old gift wrap (also used for the handle), and viola! A scrap box made of scraps. :)
I will make a tutorial later of gift boxes, as this spurred me to make some more.
--
I actually used this for the 'package' for my mother's day gift since it's perfect size, and included a set of the teacup and cupcake pincushions. I lined the box with a red satin and wrapped the smaller items in red tissue paper. Both her giftbox and her pincushions will hopefully be useful to her newly growing craft room.
I will make a tutorial later of gift boxes, as this spurred me to make some more.
--
I actually used this for the 'package' for my mother's day gift since it's perfect size, and included a set of the teacup and cupcake pincushions. I lined the box with a red satin and wrapped the smaller items in red tissue paper. Both her giftbox and her pincushions will hopefully be useful to her newly growing craft room.
If you make one of these or a variation of it, I'd love to see, so please comment!
Subscribe to:
Posts (Atom)