My Links

Showing posts with label scraps. Show all posts

Thursday, December 1, 2011

How To Make A Paper Star - Crafts

Last night I was looking over some ideas in various online magazines and came across a basic paper star craft idea. It inspired me to make my own, so I've decided to post a couple of my paper star craft ideas. The first one was mostly for an experiment. I really wanted a reason to cover newsprint cutouts of stars in glitter and since I love sleeping 'under the stars', I thought an elegant, simple mobile would add a nice touch. You can add a lot of stars or extra detail if you like, but I opted for something modest with mine. I do not suggest using these for baby beds because the glitter could fall off in bits and land in a baby's eyes.

These mobiles could also easily be used to make chimes if you have weatherproof material. Even random seashells or pieces of driftwood rather than stars would sound and look beautiful. I have seashells all over my own house, and they're very useful for various crafts.

First, if you wish to learn how to make a paper star, you can do so here. There are a lot of options for different sorts of stars you can make. Once you have your stars cut out (I just used a bunch of newspaper and ads I receive in the mail) you can follow the tutorial below, or one of the other tutorials I will be listing next.

Stars Mobile
What you will need:

  • paper stars
  • glitter
  • craft glue
  • hot glue or strong tape
  • string/ribbon
  • decorations
  • wire or something that can hold the stars (a bent coat hanger, etc)
  • a thumbtack


  1. Take your stars and coat one side in glue. Then cover this with a thick layer of glitter. I mixed some glitter to make different shades. Let dry.


2.   Get your wire and bend it to a circle. You can also use a paper plate or some sort of similar circle. Decorate this as you wish, then hot glue or firmly tape strings of different length to it. One string for each star. 


3.   Hot glue or firmly tape the tip of each star to each string. Make sure the stars are far enough apart that they don't bump into each other when hanging. 

4.   Add as much decoration as you want. I used a ribbon to hang my wire, and put a cluster of feathers hot glued to a ribbon in the center of the piece. 

5.   Hang it wherever you please. Mine is going above my bed.


Wednesday, May 4, 2011

The 'I Love You This Much' Bunny


A plushie that informs you just how much she loves you. Never mind those teddy bears when you've got bunnies like this. She is made out of some left over cupcake material, with a mildly shirred yellow heart fringed around the edge to give that 'bursting' look. Her eyes and nose are sewn on and made of black thread with three little eyelashes on each. I prefer this method sometimes because it has a more 'old fashioned' appeal that just aids the adorableness, don't you think? She is stuffed with soft synthetic fiber and stands at about a 8" tall (though technically she doesn't stand-- she's too round for that and I had to prop her a bit for the top photo). I've always loved the childish sweetness of shouting, "I love you this much!" with arms thrown wide open, and I wanted to encompass that.
My apologies for the bad lighting since this was taken at night. I've been thinking of making a lightbox to fix this. They're very easy to create and great for photographing things at any time of the day with minimal effort-- perhaps I'll put up a tutorial on it later.

Should you be mesmerized by her cuteness, she is for sale.

Tuesday, May 3, 2011

Tutorial on How to Make a Cloth Strawberry


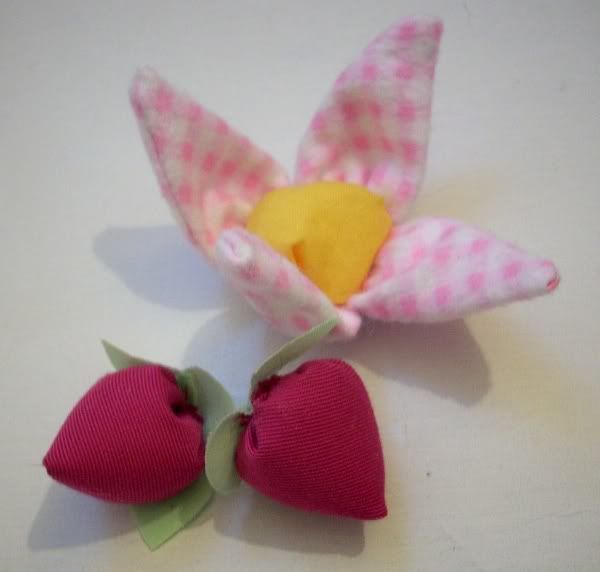
Here's a little tutorial on how to make a cloth strawberry. You can opt to make a flower instead by not stuffing the strawberry and using it as a 'petal'. Four to six petals sewn together make a very adorable flower. My flower has a cotton filled center so that it can be used as a pincushion. I do not suggest making a felt strawberry as felt tends to be a bit too thick. Something thin like cotton (in fact, I always make cotton strawberries) is much better.

On with the tutorial!


Step 1: Draw and cut out a circle from your fabric. Fold this in half and then cut along the crease so that you have two halves.


Step 2: Fold one of the halves in half, so that you have a quarter of a circle, with the face of the fabric on the inside. Sew along the straight edge, leaving the curved edge open.


Step 3: Turn it inside-out. The face of the fabric should be showing (mine is the same on both sides). Now run a small, relatively tight gathering stitch along the open edge, and do not tie it off as we will do this after stuffing. You will already see your strawberry taking shape!


Step 4: Stuff the strawberry with cotton. You can also use very finely cut up bits of fabric if you don't have any cotton. Just make sure it's well shredded. If you are making the flower, skip this step.


Step 5: Pull the gathering thread tight, this should seal up your strawberry. Stitch it securely so that it doesn't come open.


Optional step 6: Make some leaves to add to the bottom of your strawberry. If you are making the flower, just connect these petals (unstuffed strawberries) together and place something in the middle. I used a little stuffed ball of yellow cotton.


And you're done!

Be sure to leave comments, I'd love to see any ideas and finished projects involving this!

From Scraps to Scrap Box Gift Package - Perfect for Mother's Day


I don't know about you, but I save every little scrap I can, so long as there's more than just a few threads to it. While I've gotten some funny looks for it, I have always figured that you never know when you might need the oddest little bit. Well, this morning I was looking at my pile of scraps (or rather, a grocery bag full of them) and felt it needed to look a bit nicer.

Project time.


So I made a box, slathered it with fabric glue, and stuck little bits and pieces of scraps to it. Topped it off with two bows I hadn't found any use for and a bit of ribbon from an old gift wrap (also used for the handle), and viola! A scrap box made of scraps. :)
I will make a tutorial later of gift boxes, as this spurred me to make some more.
--
I actually used this for the 'package' for my mother's day gift since it's perfect size, and included a set of the teacup and cupcake pincushions. I lined the box with a red satin and wrapped the smaller items in red tissue paper. Both her giftbox and her pincushions will hopefully be useful to her newly growing craft room.

If you make one of these or a variation of it, I'd love to see, so please comment!